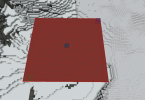
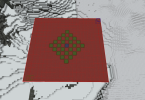
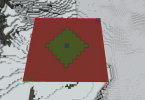
It's time for more terraforming madness with Uncle Carci! In this tutorial we'll learn how to use adjacency masks to create nice, smoothly gradiented rivers.
Note: This tutorial assumes you already
a) have Macros/Keybinds mod installed,
b) know how to use it and
c) are able to locate your macros folder.
Note 2: I'm not adding screenshots and/or examples of everything, the best way to learn them is to try them out yourself!
What is an adjacency mask?
In addition to regular masks (id, above, below etc), Worldedit is able to mask blocks based on blocks around them, i.e. adjacent blocks. The basic syntax for an adjacency mask is
~[mask][min][max] <replace with>
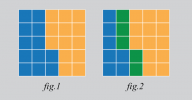
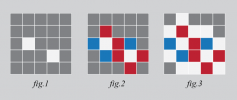
So, if we want to replace blue wool next to yellow wool into green wool (see fig.1 and 2), we tell WE to
//gmask [blue]
//replace ~[yellow][1][8] green
In plain english, "only do this to blue wool, replace blue wool blocks that have 1-8 sides touching a yellow wool block with green wool".
Like in most WE operations, you can use combinations of multiple blocks, percentages etc. So for example
//gmask gray
//replace ~[white][1][8] blue,red
replaces all gray blocks touching a white block with blue or red (fig.2), and with the same gmask
//replace ~[blue,red][1][8] white
replace all the gray blocks next to blue or red with white. (fig.3)
About [min] and [max]
With different minimum and maximum values you can do all sorts of advanced operations. For example, to find the edges of shapes:
//replace ~[air][2][8] white
turns all blocks that have more than one side exposed to air into white, and
//replace ~[air][3][8] black
turns the corner blocks into black.
Side note: Yea I don't know how a cube can have 8 sides either. According to official FAWE documentation, 8 is the maximum so we'll run with it. It might have something to do with diagonal blocks, but I haven't been able to figure out the logic.
Creating gradients with adjacency masks
By replacing a block A next to B with C, a block next to C with D and so on, we can create simple gradients easily. However, with this method you'll eventually end up with straight or diagonal lines, which doesn't look too good or natural.
To avoid this, we can add some randomness:
//gmask white
//replace ~[red][1][8] orange
//replace ~[orange][1][8] orange,white
So, first we add a solid line of orange next to red, then a 50/50 line of orange and white next to orange to make it more varied. Then we repeat the operation with orange and yellow:
//replace ~[orange][1][8] yellow
//replace ~[yellow][1][8] yellow,white
And so on. However, even with this method you'll eventually end up with non-natural looking gradients, so it's time for...
Nerdy stuff for nerds
To make things more interesting and natural looking, we can use more advanced methods of randomness (simplex, perlin etc).
//gmask [black]&~[white][1][8]
//replace =perlin(666,x/1.2,y*4,z/1.2,.4,1,.4)<.5 gray
will only replace black blocks that are next to white blocks AND are on the area defined by the perlin noise formula above, with gray blocks.
Example of adjacency masks: River script
Note: These scripts are designed for rivers in The North, if you want to use them elsewhere, just change the rock/pebble types, vegetation and biomes into something more suitable.
Note 2: While these scripts should work on slopes, it's better to use them on rivers with no elevation changes, or just do one y level at a time. Water in minecraft can be a bit fiddly sometimes.
Start by turning everything into North Terrainset, turn the top layer into green wool and paint the course the river with blue wool. You can use WE/voxel brushes, //curve command, or whatever method you're comfortable with. Just make sure there's green and blue wool only on the topmost layer.
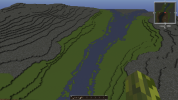
Next, select the area and expand a few blocks up and down with
//expand 5 5 u
Run the first script (North_01_Rivergradient). This will start creating the gradient by turning green next to blue into black concrete powder, then randomizing it a bit. Next, brown concrete powder next to black, then orange and yellow. After this the script does the same thing for blue/water area. These placeholders mark the different ground mixes, vegetations, biomes and so on.
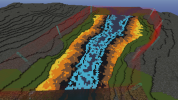
Next the script replaces some of the concrete powder blocks with concrete of the same colour to add more steps to the gradient and make it even smoother.
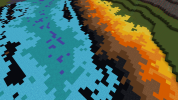
After the main gradienting part is done, the script will carve your river a bit deeper by doing some replaces under "water" blocks. It might look like nothing's happening, but be patient, the script will notify you when it's done.
Note: if you take a look at the script itself, you'll find some DO-LOOPs, for example (WAITs removed here for clarity):
$${do(4)}$$
//replace ~[252:brown][1][8] 252:brown,green
$${loop}$$
This tells the script to do the replace 4 times, then move on. It's a way to make your script a bit shorter and neater.
Now we can move to script number two, North_02_Muddy_River. Before running the script, I recommend you move a good distance away from your selection (don't warp to different world though, this'll mess up the script), the script starts with biome changes and these can be seriously laggy if you're inside/near the selection. The script will alert you when the laggy stuff is done.
There's nothing too fancy or advanced in this script, it just adds vegetation and small rocks above specified blocks, does some bushes and finally replaces the placeholders. However, this is where you can get creative; make a copy of the file, rename it and go wild. Try different block mixes, vegetation types and densities, biome combinations and so on. In a nutshell: Closer to water = more wet = darker placeholder. With water, darker placeholders mean deeper water.
Images of the script in progress and all done:
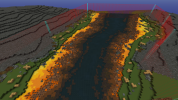
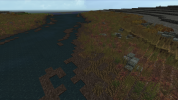
If you come up with nice variants, please post them in this thread with screenshots! I'll add some sandy and rocky scripts soon, until that, happy terraforming!
EDIT: Oops, I accidentally attached an old, unfinished version of Rivergradient script. It works, but it's now replaced with a more refined version.
Note: This tutorial assumes you already
a) have Macros/Keybinds mod installed,
b) know how to use it and
c) are able to locate your macros folder.
Note 2: I'm not adding screenshots and/or examples of everything, the best way to learn them is to try them out yourself!
What is an adjacency mask?
In addition to regular masks (id, above, below etc), Worldedit is able to mask blocks based on blocks around them, i.e. adjacent blocks. The basic syntax for an adjacency mask is
~[mask][min][max] <replace with>
So, if we want to replace blue wool next to yellow wool into green wool (see fig.1 and 2), we tell WE to
//gmask [blue]
//replace ~[yellow][1][8] green
In plain english, "only do this to blue wool, replace blue wool blocks that have 1-8 sides touching a yellow wool block with green wool".

Like in most WE operations, you can use combinations of multiple blocks, percentages etc. So for example
//gmask gray
//replace ~[white][1][8] blue,red
replaces all gray blocks touching a white block with blue or red (fig.2), and with the same gmask
//replace ~[blue,red][1][8] white
replace all the gray blocks next to blue or red with white. (fig.3)

About [min] and [max]
With different minimum and maximum values you can do all sorts of advanced operations. For example, to find the edges of shapes:
//replace ~[air][2][8] white
turns all blocks that have more than one side exposed to air into white, and
//replace ~[air][3][8] black
turns the corner blocks into black.
Side note: Yea I don't know how a cube can have 8 sides either. According to official FAWE documentation, 8 is the maximum so we'll run with it. It might have something to do with diagonal blocks, but I haven't been able to figure out the logic.
Creating gradients with adjacency masks
By replacing a block A next to B with C, a block next to C with D and so on, we can create simple gradients easily. However, with this method you'll eventually end up with straight or diagonal lines, which doesn't look too good or natural.
To avoid this, we can add some randomness:
//gmask white
//replace ~[red][1][8] orange
//replace ~[orange][1][8] orange,white
So, first we add a solid line of orange next to red, then a 50/50 line of orange and white next to orange to make it more varied. Then we repeat the operation with orange and yellow:
//replace ~[orange][1][8] yellow
//replace ~[yellow][1][8] yellow,white
And so on. However, even with this method you'll eventually end up with non-natural looking gradients, so it's time for...
Nerdy stuff for nerds
To make things more interesting and natural looking, we can use more advanced methods of randomness (simplex, perlin etc).
//gmask [black]&~[white][1][8]
//replace =perlin(666,x/1.2,y*4,z/1.2,.4,1,.4)<.5 gray
will only replace black blocks that are next to white blocks AND are on the area defined by the perlin noise formula above, with gray blocks.
Example of adjacency masks: River script
Note: These scripts are designed for rivers in The North, if you want to use them elsewhere, just change the rock/pebble types, vegetation and biomes into something more suitable.
Note 2: While these scripts should work on slopes, it's better to use them on rivers with no elevation changes, or just do one y level at a time. Water in minecraft can be a bit fiddly sometimes.
Start by turning everything into North Terrainset, turn the top layer into green wool and paint the course the river with blue wool. You can use WE/voxel brushes, //curve command, or whatever method you're comfortable with. Just make sure there's green and blue wool only on the topmost layer.

Next, select the area and expand a few blocks up and down with
//expand 5 5 u
Run the first script (North_01_Rivergradient). This will start creating the gradient by turning green next to blue into black concrete powder, then randomizing it a bit. Next, brown concrete powder next to black, then orange and yellow. After this the script does the same thing for blue/water area. These placeholders mark the different ground mixes, vegetations, biomes and so on.

Next the script replaces some of the concrete powder blocks with concrete of the same colour to add more steps to the gradient and make it even smoother.

After the main gradienting part is done, the script will carve your river a bit deeper by doing some replaces under "water" blocks. It might look like nothing's happening, but be patient, the script will notify you when it's done.
Note: if you take a look at the script itself, you'll find some DO-LOOPs, for example (WAITs removed here for clarity):
$${do(4)}$$
//replace ~[252:brown][1][8] 252:brown,green
$${loop}$$
This tells the script to do the replace 4 times, then move on. It's a way to make your script a bit shorter and neater.
Now we can move to script number two, North_02_Muddy_River. Before running the script, I recommend you move a good distance away from your selection (don't warp to different world though, this'll mess up the script), the script starts with biome changes and these can be seriously laggy if you're inside/near the selection. The script will alert you when the laggy stuff is done.
There's nothing too fancy or advanced in this script, it just adds vegetation and small rocks above specified blocks, does some bushes and finally replaces the placeholders. However, this is where you can get creative; make a copy of the file, rename it and go wild. Try different block mixes, vegetation types and densities, biome combinations and so on. In a nutshell: Closer to water = more wet = darker placeholder. With water, darker placeholders mean deeper water.
Images of the script in progress and all done:


If you come up with nice variants, please post them in this thread with screenshots! I'll add some sandy and rocky scripts soon, until that, happy terraforming!
EDIT: Oops, I accidentally attached an old, unfinished version of Rivergradient script. It works, but it's now replaced with a more refined version.
Attachments
Last edited:


