Terra School: Commands

Jakethesnake8_8

Firemage
Pronouns
he/him
Hello hello! I'm back with another informative post for you all. This time, I'll be focusing more on commands than any specific landform. Hopefully, this helps you all in your own terra pursuits.

(V) = voxel commands (W) = WorldEdit commands

/b e melt (V)
- binds to arrow and gunpowder

/b e melt is a handy tool for making ridges and gulleys in mountains and hills. I find it particularly useful when making mountains, but everyone has their own process. Something to note about this command is that the area you use it on should all be 1 material, otherwise you may risk it creating weird shapes and not getting the desired effect. /b e melt, like most voxel commands is different depending on if you use an arrow or gunpowder. The arrow melts away terrain, and the gunpowder extrudes terrain outwards.

/b bb (V)
- binds to arrow and gunpowder

This is a tool I use to smooth out large areas before going in with my hand or the //sel poly method to fix abnormalities. Unlike the previous command, it doesn't matter if you use an arrow or gunpowder, it does the same thing. Similarly, it requires the area to be one material to avoid any weird shapes.

adjacency mask (W)

This command affects blocks adjacent to another, which makes it handy when making riverbanks, or roads or lazy gradients. It follows the format of //replace A&~ C. A refers to the block being replaced. The &~ means it only affects block A when it's next to B. So this command will replace block A next to block B and turn it into block C. For example, if I wanted to replace grass blocks next to water and turn them into mud, I'd do //replace grass&~[water] 2034:0.

horizontal adjacency mask (W)

This command only affects blocks that are horizontally adjacent, whereas the previous one affects blocks vertically and horizontally adjacent. The format is //replace A&|[1][8] C. The [1][8] must be there for it to work.

above and below masking (W)

This one will take you back to 1st-grade math with < and >. For example, //replace >2 31:1. This means it will replace everything on top of 2 (grass block) with 31:1 (grass plants). Using < sign will have the opposite effect. If you want it to only affect air blocks, put 0&>[2] instead of >2.

simplex (W)

This is where it starts to get tricky, so simplex creates patches of a certain block. The format of this command is //replace A&#simplex[scale][min][max]. It's a bit hard to explain, but the first number controls how frequently patches appear, and the second and third numbers control what range is replaced. If anyone can explain it better please do (I'm looking at you Scub). For example, if I wanted to replace my grass plants with some flower patches, I'd do //replace 31:1&#simplex[10][40][80] 2005:0. That will mix in some flowers in patches. The result probably won't look that good, but it's just an example. You can of course add more ID's to create a more interesting pattern.

random masking (W)

Here is where you can create random noise patterns using percents. Say I want to make my grass field more interesting. I might do //replace 31:1 10%31:1,90%31:2. That will add more ferns than grass. You can add as many ID's so long as you put a percentage for each of them, and it all adds up to 100%.

perlin (W)

This one I don't understand very well, I just copy and paste it from my notes app :p. This creates a more effective noise pattern but is harder to work with. First, you want to gmask what you are replacing. Then run for example //replace =perlin(200,x,y,z,.49,4,1)<.001 35:13. This will create a random noise of 35:13 (green wool). Voronoi and Ridgedmulti use the same format. I don't know how to use those, but Emot knows more about them than I do.

Let me know if I forgot anything, or if you have better explanations than me please put them below :)

- Jake
 

Emoticone11

The Dark Lord Sauron
Staff member
Thanks Jake, this is a helpful resource! I'll add some of my own Voxel/WE notes below (rather long winded, but intended for people who want to really understand what's going on behind the scenes rather than just memorizing useful commands):

Voxel

IMPORTANT WARNING: with Voxel, there aren't any limits on brush distances. If you misclick, the brush will be applied wherever you were aiming at, even if it's way outside of your render distance. Given this, I suggest not using Voxel in areas of Test which are very dense (e.g., test plots), but rather in the EditorFree4All area. If you do use Voxel, be very careful where you're clicking.

There are a lot of weird aspects of Voxel that come from pre-1.12 versions of minecraft that are important to understand for using Voxel brushes. These aren't relevant to erosion brushes (like melt), but are relevant to other Voxel brushes (most of these can be done using WE as well, but the Voxel versions are sometimes faster).

Take the Voxel sphere brush for this example: /b b

Changing brush size is simple: just /b <#>, e.g., /b 5

In pre-1.12 versions of minecraft, every block had a unique pair of ID and metadata (technically this is true in 1.12 as well, but they're considered obsolete, so plugins like Voxel don't rely on them anymore). For instance, black wool has the ID 35 and metadata 15, written as 35:15.

Voxel brushes allowed you to change only the ID, only the metadata, or both. This could be specified using performers, which are either m (material/ID), i (ink/metadata), or c (combo). So for example,

* To change only ID: /b b m

* To change both the ID and metadata: /b b c

By default, if you just type /b b, the material performer is selected. So if you just want to brush some specific ID/metadata combo, you need to explicitly do /b b c.

In previous versions of minecraft, you would then select the material/ID by doing /v <id>, and the ink/metadata by doing /vi <metadata>. However, since the ID/metadata thing is being phased out in 1.12 (and will be removed completely in 1.13), you now need to select both the ID and metadata by pointing at a block with your cursor, and then just typing /v (or /v air for ID 0).

Additionally, you can set a brush to replace mode by adding a second performer, which specifies whether to replace the ID, metadata, or both of the block you want to replace.

* To swap out the ID of one block for another: /b b mm

* To swap one ID/metadata combo with another: /b b cc

Likewise, you would previously have selected the ID and metadata to replace using /vr <id> and /vir <metadata> respectively, but now you just point at the block you want to replace and do /vr.

More Voxel notes here: https://westeroscraft.fandom.com/wiki/VoxelSniper_Basics


Resetting

This is fairly important to know IMO, since if you're carrying arrows around in your inventory, it's possible to misclick and cause an accident. Resetting with Voxel is easy: just type /d. Your brush will be changed back to the default, which is just a size 1 snipe brush with material air. Always reset once you're done terraforming with some brush.


Erosion brushes

The melt brush that Jake mentioned is one particular erosion brush. There are four that are worth noting:

* /b e melt
* /b e fill
* /b e lift
* /b e smooth

The names are fairly self-explanatory. There's also the blend ball brush Jake mentioned, /b bb, which is like the smooth erosion brush on steroids. I recommend using it lightly if you're doing stuff like cliffs or mountains, since it's possible to over-smooth and end up with weird artifacts.

We also have custom versions of the erosion brushes that were imported from a previous version of Voxel - notable mainly because some of the brushes, such as lift, were more powerful than in the newer version. To use these, simply change the "e" to "eo" - e.g., /b eo lift. However, these brushes may mess up the metadata of blocks, so you'll need to fix that after.


Line brush

This brush is useful for creating, well, straight lines. To use it, do /b line c (see the stuff about performers above). Select a material using /v. Right-click the start block with the arrow tool, and then right-click the end block with the gunpowder tool.


WorldEdit

The most important general thing with WorldEdit, IMO, is learning the overall syntax - that is, the allowed format of commands, patterns, and masks.

The wiki page for WorldEdit is super useful; here I'll try to give the basics to help you better understand the wiki page.

As a general primer on syntax, a syntax can be represented using a grammar, which uses a notation that I'll illustrate with a simple example:

<token> := (<left> <right>)
<left> := 1 | 2 | 3 | ...
<right> := a | b | c | ...

The := symbol means "is defined as". Anything with angled brackets, e.g. <left>, is interpreted as a placeholder where you can substitute anything from the rule for that placeholder. The | symbol means "or". You may also see square brackets for placeholders, e.g. [token], which would mean that the placeholder is optional. All other symbols are interpreted literally (I use bold for literal symbols, since it can get confusing sometimes).

So for example, lets say you want to generate a token according to this grammar. You start out with the rule for <token>, which says that you have an opening and closing parenthesis, with a <left> placeholder and a <right> placeholder in-between. Then you follow the rule for <left>, which allows for any number. Then you follow the rule for <right>, which allows for any letter. Following these rules, you might end up with the token (1 a). You could also end up with the token (5 z). All of these tokens are allowed according to the syntax. However, the token (1 a z) would not be allowed by the syntax, since it's not a result you can get from the grammar.

Okay, now back to the WorldEdit syntax... similarly, WorldEdit defines a grammar that specifies what commands are allowed, and which ones aren't. It's important to understand this grammar, since if you know the grammar, you can use it to generate a command for whatever task you want to do.

To start with, a pattern specifies the particular arrangement of blocks to be generated, while a mask specifies the existing blocks that a command is restricted to. A typical command, for example, is: //replace <mask> <pattern> or //set <pattern>, which suffice for most cases.

You can also do
//mask <mask> with WE brushes, and //gmask <mask> which applies the mask to any WE command (but remember to reset it after with //gmask).

Patterns

The simplest pattern is just a single block - e.g., black wool. Black wool can be specified using one of three ways: the ID/metadata combination (35:15), the formal namespace (minecraft:black_wool), or an alias defined by WorldEdit (black). Since the namespaces can get quite long, you typically want to use the ID/metadata, or the alias. Representing this using the grammar, we have:

<pattern> := 35:15 | minecraft:black_wool | black | ...

A pattern can also be a random mix of patterns:

<pattern> := <percent><pattern>,<percent><pattern>,...

For example, you could have the pattern 25%35:15,75%red, which will do black wool 25% of the time and red wool 75% of the time. Note that I had different formats for the black and the red wool. In fact, since the <pattern> definition is recursive (<pattern> recurs inside of the definition), any valid pattern is allowable for each part of the mix. This recursion makes WE a super flexible tool.

Some other useful patterns:

<pattern> := $<biome> (pattern is a particular biome that gets applied to whatever blocks are masked)

<pattern> := #clipboard (pattern is whatever you've copied using //copy)

<pattern> := #id[<number>] (pattern is a block ID, keeping metadata constant -- very useful for swapping layer blocks or stair blocks in one go)

These are the only patterns I really use in practice, since most other use cases can be specified using the mask instead.

Masks

Similarly to patterns, masks are often defined recursively. This is really important to understand, since it means you can accomplish many things simply by chaining together masks. Note that masks and arguments often need to be enclosed in square brackets in commands to remove ambiguity, as I'll show in the grammar (using bold to distinguish from optional placeholders in the syntax). Sometimes these can be omitted in a command, but they're technically part of the syntax and I recommend having them to avoid unintended behavior.

The first thing to understand are connectives:

<mask> := [<mask>]&[<mask>]
<mask> := [<mask>],[<mask>]
<mask> := ![<mask>]

The first of these means to mask all blocks where the first mask applies and the second mask applies, while the second means to mask all blocks where the first mask applies or the second mask applies. The final one is negation, i.e., it says to mask every block except the specified mask. Note that the recursion means that you can have any complex conjunction of nested connectives as a mask; this is very powerful.

Like patterns, a basic mask can just be a single type of block:

<mask> := 35:15 | minecraft:black_wool | black | ...

Or you can have a mask that selects directly above/below a mask:

<mask> := >[<mask>] | <[<mask>]

With these definitions in hand, you can easily see how to produce the "mask air on top of grass blocks" mask that Jake mentioned - [0]&[>[2]] - just by combining the above grammar rules (some of the brackets here can safely be omitted to get the equivalent mask 0&>[2]).

I'll give some more details on some of the more complex masks below:


Adjacency

The syntax for these two masks are as follows:

<mask> := ~[<mask>][<min>][<max>]
<mask> := |[<mask>][<min>][<max>]


As Jake mentioned, the difference between these two is that the first one also includes top & bottom as adjacent sides, while the second only uses horizontal faces. The min/max parameters specify a range for how many adjacent faces there must be for the mask to apply.

For example, lets say we have the adjacency mask [red]&~[black][2][4]. This mask will effect any red block with at least two, and at most four, black blocks adjacent to it.

Gradient

The gradient mask is an incredibly useful one for doing slopes and mountainous terrain. The syntax is:

<mask> := \[<angle>][<angle>]

Where <angle> is an angle in degrees, such as "45d" or "90d". For instance, if you want to replace all grey wool at a shallow angle with grass, you could use the mask
[grey]&\[0d][45d]

Important note: this mask will only work if you have a cuboid selection; otherwise you will run into issues.


Offset

This one is not very well known, but can be very useful in some cases (such as in forest scripts, where you want to place schematics - using the #clipboard pattern - with some offset to a placeholder block).

<mask> := #offset[<dx>][<dy>][<dz>][<mask>]

Where <dx>, <dy>, and <dz> are all numbers specifying the necessary offset for the mask to apply. For example, if you have the mask
[red]&#offset[-5][0][0][black], it will mask all red blocks that are 5 blocks west of a black block.

Important note: the y-axis in minecraft is inverted, so you have to use negative offsets for masking above a block, and positive offsets for masking below a block.


Simplex/Perlin

Simplex noise is actually just a special case of Perlin noise that's a bit simpler; more efficient but less flexible. I usually prefer using Perlin noise wherever possible due to the higher quality noise, which is made really easy if you have the Macro/Keybind mod and my noise scripts.

Anyways, the syntax for Simplex noise is as follows:

<mask> := #simplex[<scale>][<min>][<max>]

Where <scale>, <min>, and <max> are all numbers between 0 and 100, and also need to satisfy the inequality scale <= min <= max. For example, you could have the mask [grey]&#simplex[20][50][80]

An intuitive way to think about it is that simplex noise generates a black-and-white "cloud" pattern like this one. Increasing the <scale> parameter is equivalent to zooming in on part of the pattern, so that the blobs seem larger. In order to actually apply the simplex as a mask, you need to select a certain range of the black-white spectrum to actually mask. This is what <min> and <max> do; they select the minimum and maximum lightness of the simplex pattern that are used to determine the mask.

If you select fairly high values of <min> and <max>, such as [80][100], you'll be masking the black regions of the cloud pattern and will therefore get more "blob-like" noise, as shown here. On the other hand, if you select middle-range values such as [40][50], you'll be masking the gray regions of the cloud pattern and will therefore get more "snake-like" noise corresponding to the edges of the blobs, as shown here.

Perlin noise is rather more complicated, as it allows you to specify all of the parameters rather than just the scale and threshold. I won't explain it here, but I do have an explanation of it in my noise scripts thread.


That's all for now, though there are other useful WE commands outside of patterns/masks that I might describe later if I have time.
 
Last edited:

Wazgamer

Lord Paramount of The Riverlands
Pronouns
they/them
Emot do you have a simplex script?
Thanks Jake, this is a helpful resource! I'll add some of my own Voxel/WE notes below (rather long winded, but intended for people who want to really understand what's going on behind the scenes rather than just memorizing useful commands):

Voxel

IMPORTANT WARNING: with Voxel, there aren't any limits on brush distances. If you misclick, the brush will be applied wherever you were aiming at, even if it's way outside of your render distance. Given this, I suggest not using Voxel in areas of Test which are very dense (e.g., test plots), but rather in the EditorFree4All area. If you do use Voxel, be very careful where you're clicking.

There are a lot of weird aspects of Voxel that come from pre-1.12 versions of minecraft that are important to understand for using Voxel brushes. These aren't relevant to erosion brushes (like melt), but are relevant to other Voxel brushes (most of these can be done using WE as well, but the Voxel versions are sometimes faster).

Take the Voxel sphere brush for this example: /b b

Changing brush size is simple: just /b <#>, e.g., /b 5

In pre-1.12 versions of minecraft, every block had a unique pair of ID and metadata (technically this is true in 1.12 as well, but they're considered obsolete, so plugins like Voxel don't rely on them anymore). For instance, black wool has the ID 35 and metadata 15, written as 35:15.

Voxel brushes allowed you to change only the ID, only the metadata, or both. This could be specified using performers, which are either m (material/ID), i (ink/metadata), or c (combo). So for example,

* To change only ID: /b b m

* To change both the ID and metadata: /b b c

By default, if you just type /b b, the material performer is selected. So if you just want to brush some specific ID/metadata combo, you need to explicitly do /b b c.

In previous versions of minecraft, you would then select the material/ID by doing /v <id>, and the ink/metadata by doing /vi <metadata>. However, since the ID/metadata thing is being phased out in 1.12 (and will be removed completely in 1.13), you now need to select both the ID and metadata by pointing at a block with your cursor, and then just typing /v (or /v air for ID 0).

Additionally, you can set a brush to replace mode by adding a second performer, which specifies whether to replace the ID, metadata, or both of the block you want to replace.

* To swap out the ID of one block for another: /b b mm

* To swap one ID/metadata combo with another: /b b cc

Likewise, you would previously have selected the ID and metadata to replace using /vr <id> and /vir <metadata> respectively, but now you just point at the block you want to replace and do /vr.

More Voxel notes here: https://westeroscraft.fandom.com/wiki/VoxelSniper_Basics


Resetting

This is fairly important to know IMO, since if you're carrying arrows around in your inventory, it's possible to misclick and cause an accident. Resetting with Voxel is easy: just type /d. Your brush will be changed back to the default, which is just a size 1 snipe brush with material air. Always reset once you're done terraforming with some brush.


Erosion brushes

The melt brush that Jake mentioned is one particular erosion brush. There are four that are worth noting:

* /b e melt
* /b e fill
* /b e lift
* /b e smooth

The names are fairly self-explanatory. There's also the blend ball brush Jake mentioned, /b bb, which is like the smooth erosion brush on steroids. I recommend using it lightly if you're doing stuff like cliffs or mountains, since it's possible to over-smooth and end up with weird artifacts.

We also have custom versions of the erosion brushes that were imported from a previous version of Voxel - notable mainly because some of the brushes, such as lift, were more powerful than in the newer version. To use these, simply change the "e" to "eo" - e.g., /b eo lift. However, these brushes may mess up the metadata of blocks, so you'll need to fix that after.


Line brush

This brush is useful for creating, well, straight lines. To use it, do /b line c (see the stuff about performers above). Select a material using /v. Right-click the start block with the arrow tool, and then right-click the end block with the gunpowder tool.


WorldEdit

The most important general thing with WorldEdit, IMO, is learning the overall syntax - that is, the allowed format of commands, patterns, and masks.

The wiki page for WorldEdit is super useful; here I'll try to give the basics to help you better understand the wiki page.

As a general primer on syntax, a syntax can be represented using a grammar, which uses a notation that I'll illustrate with a simple example:

<token> := (<left> <right>)
<left> := 1 | 2 | 3 | ...
<right> := a | b | c | ...

The := symbol means "is defined as". Anything with angled brackets, e.g. <left>, is interpreted as a placeholder where you can substitute anything from the rule for that placeholder. The | symbol means "or". You may also see square brackets for placeholders, e.g. [token], which would mean that the placeholder is optional. All other symbols are interpreted literally (I use bold for literal symbols, since it can get confusing sometimes).

So for example, lets say you want to generate a token according to this grammar. You start out with the rule for <token>, which says that you have an opening and closing parenthesis, with a <left> placeholder and a <right> placeholder in-between. Then you follow the rule for <left>, which allows for any number. Then you follow the rule for <right>, which allows for any letter. Following these rules, you might end up with the token (1 a). You could also end up with the token (5 z). All of these tokens are allowed according to the syntax. However, the token (1 a z) would not be allowed by the syntax, since it's not a result you can get from the grammar.

Okay, now back to the WorldEdit syntax... similarly, WorldEdit defines a grammar that specifies what commands are allowed, and which ones aren't. It's important to understand this grammar, since if you know the grammar, you can use it to generate a command for whatever task you want to do.

To start with, a pattern specifies the particular arrangement of blocks to be generated, while a mask specifies the existing blocks that a command is restricted to. A typical command, for example, is: //replace <mask> <pattern> or //set <pattern>, which suffice for most cases.

You can also do
//mask <mask> with WE brushes, and //gmask <mask> which applies the mask to any WE command (but remember to reset it after with //gmask).

Patterns

The simplest pattern is just a single block - e.g., black wool. Black wool can be specified using one of three ways: the ID/metadata combination (35:15), the formal namespace (minecraft:black_wool), or an alias defined by WorldEdit (black). Since the namespaces can get quite long, you typically want to use the ID/metadata, or the alias. Representing this using the grammar, we have:

<pattern> := 35:15 | minecraft:black_wool | black | ...

A pattern can also be a random mix of patterns:

<pattern> := <percent><pattern>,<percent><pattern>,...

For example, you could have the pattern 25%35:15,75%red, which will do black wool 25% of the time and red wool 75% of the time. Note that I had different formats for the black and the red wool. In fact, since the <pattern> definition is recursive (<pattern> recurs inside of the definition), any valid pattern is allowable for each part of the mix. This recursion makes WE a super flexible tool.

Some other useful patterns:

<pattern> := $<biome> (pattern is a particular biome that gets applied to whatever blocks are masked)

<pattern> := #clipboard (pattern is whatever you've copied using //copy)

<pattern> := #id[<number>] (pattern is a block ID, keeping metadata constant -- very useful for swapping layer blocks or stair blocks in one go)

These are the only patterns I really use in practice, since most other use cases can be specified using the mask instead.

Masks

Similarly to patterns, masks are often defined recursively. This is really important to understand, since it means you can accomplish many things simply by chaining together masks. Note that masks and arguments often need to be enclosed in square brackets in commands to remove ambiguity, as I'll show in the grammar (using bold to distinguish from optional placeholders in the syntax). Sometimes these can be omitted in a command, but they're technically part of the syntax and I recommend having them to avoid unintended behavior.

The first thing to understand are connectives:

<mask> := [<mask>]&[<mask>]
<mask> := [<mask>],[<mask>]
<mask> := ![<mask>]

The first of these means to mask all blocks where the first mask applies and the second mask applies, while the second means to mask all blocks where the first mask applies or the second mask applies. The final one is negation, i.e., it says to mask every block except the specified mask. Note that the recursion means that you can have any complex conjunction of nested connectives as a mask; this is very powerful.

Like patterns, a basic mask can just be a single type of block:

<mask> := 35:15 | minecraft:black_wool | black | ...

Or you can have a mask that selects directly above/below a mask:

<mask> := >[<mask>] | <[<mask>]

With these definitions in hand, you can easily see how to produce the "mask air on top of grass blocks" mask that Jake mentioned - [0]&[>[2]] - just by combining the above grammar rules (some of the brackets here can safely be omitted to get the equivalent mask 0&>[2]).

I'll give some more details on some of the more complex masks below:


Adjacency

The syntax for these two masks are as follows:

<mask> := ~[<mask>][<min>][<max>]
<mask> := |[<mask>][<min>][<max>]


As Jake mentioned, the difference between these two is that the first one also includes top & bottom as adjacent sides, while the second only uses horizontal faces. The min/max parameters specify a range for how many adjacent faces there must be for the mask to apply.

For example, lets say we have the adjacency mask [red]&~[black][2][4]. This mask will effect any red block with at least two, and at most four, black blocks adjacent to it.

Gradient

The gradient mask is an incredibly useful one for doing slopes and mountainous terrain. The syntax is:

<mask> := \[<angle>][<angle>]

Where <angle> is an angle in degrees, such as "45d" or "90d". For instance, if you want to replace all grey wool at a shallow angle with grass, you could use the mask
[grey]&\[0d][45d]

Important note: this mask will only work if you have a cuboid selection; otherwise you will run into issues.


Offset

This one is not very well known, but can be very useful in some cases (such as in forest scripts, where you want to place schematics - using the #clipboard pattern - with some offset to a placeholder block).

<mask> := #offset[<dx>][<dy>][<dz>][<mask>]

Where <dx>, <dy>, and <dz> are all numbers specifying the necessary offset for the mask to apply. For example, if you have the mask
[red]&#offset[-5][0][0][black], it will mask all red blocks that are 5 blocks west of a black block.

Important note: the y-axis in minecraft is inverted, so you have to use negative offsets for masking above a block, and positive offsets for masking below a block.


Simplex/Perlin

Simplex noise is actually just a special case of Perlin noise that's a bit simpler; more efficient but less flexible. I usually prefer using Perlin noise wherever possible due to the higher quality noise, which is made really easy if you have the Macro/Keybind mod and my noise scripts.

Anyways, the syntax for Simplex noise is as follows:

<mask> := #simplex[<scale>][<min>][<max>]

Where <scale>, <min>, and <max> are all numbers between 0 and 100, and also need to satisfy the inequality scale <= min <= max. For example, you could have the mask [grey]&#simplex[20][50][80]

An intuitive way to think about it is that simplex noise generates a black-and-white "cloud" pattern like this one. Increasing the <scale> parameter is equivalent to zooming in on part of the pattern, so that the blobs seem larger. In order to actually apply the simplex as a mask, you need to select a certain range of the black-white spectrum to actually mask. This is what <min> and <max> do; they select the minimum and maximum lightness of the simplex pattern that are used to determine the mask.

If you select fairly high values of <min> and <max>, such as [80][100], you'll be masking the black regions of the cloud pattern and will therefore get more "blob-like" noise, as shown here. On the other hand, if you select middle-range values such as [40][50], you'll be masking the gray regions of the cloud pattern and will therefore get more "snake-like" noise corresponding to the edges of the blobs, as shown here.

Perlin noise is rather more complicated, as it allows you to specify all of the parameters rather than just the scale and threshold. I won't explain it here, but I do have an explanation of it in my noise scripts thread.


That's all for now, though there are other useful WE commands outside of patterns/masks that I might describe later if I have time.
 
  • Like
Reactions: Jeffjunior77

AerioOndos

Donkey Lord
Staff member
Pronouns
they/them
In the thread Kulmens WE notes there are some good guides on using simplex and Perlin together to create patches of noise.
 
  • Like
Reactions: Wazgamer

CashBanks

A Knight at the Opera
Staff member
Kulmen's WE notes thread for reference

Also to build on Emote's earlier post, it's worth repeating how easy it is (currently) to replace biomes using WE.

Biomes can be integrated into regular WE commands like any normal block:
E.g.
- if you wanted to set all blocks in a selection to the Plains biome, you can just write //set $Plains.
- You can similarly replace specific blocks with a specific biome, //rep water $Ocean

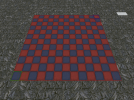
Another useful pattern is #l3d
No idea what it means, but it can be used to make checkerboard patterns.
E.g.
- //set #l3d[blue,red] creates this:
2023-01-22_13.41.49.png

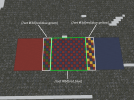
So if you wanted to you can combine #l3d with the biomes, you can create some nice biome transitions.

E.g if we wanted to transition Plains to Extreme Hills, we could try this

2023-01-22_13.51.48.png

You could then swap the placeholder wool blocks to their corresponding biome:
//rep red,green #Plains
//rep blue,yellow #ExtremeHills

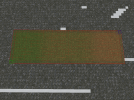
then swap the wool to grass
//rep 35 grass

and we get this:
2023-01-22_13.49.45.png

Biome mechanics will be changing in 1.18 so I'm not sure how this technique will work long term, but give it a shot while you can!