Hey all, I'd like to preface this tutorial by saying that this is just how I do rivers, and every builder/editor is going to have a different style. Without further ado, here's the guide!
This style of river is suited to flatter terrain, where it can meander and take up space. Rivers are never straight lines, there are always bends, which is a result of erosion. Typically, the faster a river is the more erosive it is. Faster rivers can sometimes create little 'cliffs' where the land has not slowly been eroded. Something that really helped me was looking at videos of stream tables. Stream tables are simulations for rivers, which are filled with sand, or glass beads or some other kind of media. They are angled to control the speed of the water, and they allow researchers to replicate situations in a lab. Below are some videos that might help.
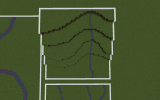
One common mistake that I've noticed is in river placement. Rivers form as a collection of runoff and groundwater in higher land. Water will ALWAYS take the easiest path downwards, and this is where people slip up. In the image below, the river follows the easiest path down. It wouldn't flow down the ridges, as gravity would pull it into gullies like so.
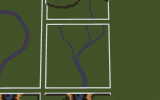
The next problem I've noticed, is river thickness. Rivers start off being 1 block wide, and as more streams meet, the river width increases by 1 block. So in this image, three 1 block streams meet to eventually be 3 blocks wide.
Here's the tutorial!
Step 1: Shaping
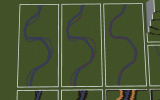
Firstly, let's shape the main channel of the river. Using //sel convex while holding the WorldEdit wand, select the first point with the left-click, and subsequent points with the right-click. I selected the red concrete blocks that are marked below. To get the river, do //gmask 2&<[0]. This command makes it so all WorldEdit actions only apply to 2 (the ID for grass) under 0 (air). Next, do //curve 35:11 1. This command magically creates the curve. Next, I like to do a secondary channel. The way I do this is to follow the shape of the main channel, only exaggerate the bends. I typically find this creates the best results. So the next command you want to run is //gmask, as doing //curve at this size doesn't work. As before, I selected the red points and ran //curve 35:11 (note there is no 1 at the end). Next, I like to hand fix any weird-looking sections.
Step 2: Riverbanks
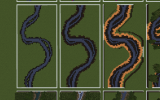
The next two commands to run are adjacency masks and will affect the blocks next to a certain block, in this case, blue wool. First, you want to run //rep 2&|[35:11][1][8] 35:15, then //rep 2&|[35:15][1][8] 35:15,2. Then run //rep 2&|[35:15][1][8] 35:12, and then //rep 2&|[35:12][1][8] 35:12,2. Finally, run //rep 2&|[35:12][1][8] 35:1 and then //rep 2&|[35:1][1][8] 35:1 two times. Then, using //sel poly, roughly select an area of grass and stack it 1 block up, in order to make the river in a ditch. Before we continue, let's break down the adjacency command. So the syntax is //rep (block being replaced)&|(this line means next to)[block that is replaced from][1][8] (block that replaces the block being replaced).
Step 3: River Foliage
So typically, at the edge of a riverbank, a lot of shrubs, and trees tend to grow, which helps block floodwater. So I like to use 2 schematics, which are NettleBocage and SedgeBush. In order to place schems, grab a snowball and type /schbr &NettleBocage. Capitalisation is important, as it won't work if you don't type it correctly. For the trees, I use LOakL, JElmS, PoplarM, JElmM. This last one hasn't yet been made a schem, but it will be soon . I hand place leaves on LOakL, as they don't come with leaves on them. Next, do //gmask 0 and then //rep >35:12 2155:0. Then do //rep >35:1 95:6,95:1, and //rep >95:6 95:1. Next, run //rep >2 31:1,31:2. Finally, do //gmask and //rep 95:6 2205:3, and //rep 95:1 18:0.
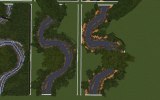
Step 4: Texturing
Now onto painting the placeholders. Start out by doing //rep 35:15 2149:4, then //rep 35:12 2034:0,2149:4. Next, use an adjacency mask to put gravel and dirt next to the mud. Do //rep 35:1&|[2034:0,2149:4][1][8] 3,13. Then do //rep 35:1 35:1,3,13. Do //rep 35:1 $forest, and then //rep 35:1 2. Now do //rep <35:11 2149:4. For this step, make sure that your selection is deep enough. Finally, do //rep 35:11&|[2149:4][1][8] 35:3 and then //rep 35:11 $river. To finish it off, do //rep 35:3,35:11 water. Ta-Da! You got a river now.
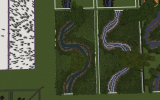
So hopefully this guide was helpful for you guys!
This style of river is suited to flatter terrain, where it can meander and take up space. Rivers are never straight lines, there are always bends, which is a result of erosion. Typically, the faster a river is the more erosive it is. Faster rivers can sometimes create little 'cliffs' where the land has not slowly been eroded. Something that really helped me was looking at videos of stream tables. Stream tables are simulations for rivers, which are filled with sand, or glass beads or some other kind of media. They are angled to control the speed of the water, and they allow researchers to replicate situations in a lab. Below are some videos that might help.
One common mistake that I've noticed is in river placement. Rivers form as a collection of runoff and groundwater in higher land. Water will ALWAYS take the easiest path downwards, and this is where people slip up. In the image below, the river follows the easiest path down. It wouldn't flow down the ridges, as gravity would pull it into gullies like so.

The next problem I've noticed, is river thickness. Rivers start off being 1 block wide, and as more streams meet, the river width increases by 1 block. So in this image, three 1 block streams meet to eventually be 3 blocks wide.

Here's the tutorial!
Step 1: Shaping
Firstly, let's shape the main channel of the river. Using //sel convex while holding the WorldEdit wand, select the first point with the left-click, and subsequent points with the right-click. I selected the red concrete blocks that are marked below. To get the river, do //gmask 2&<[0]. This command makes it so all WorldEdit actions only apply to 2 (the ID for grass) under 0 (air). Next, do //curve 35:11 1. This command magically creates the curve. Next, I like to do a secondary channel. The way I do this is to follow the shape of the main channel, only exaggerate the bends. I typically find this creates the best results. So the next command you want to run is //gmask, as doing //curve at this size doesn't work. As before, I selected the red points and ran //curve 35:11 (note there is no 1 at the end). Next, I like to hand fix any weird-looking sections.

Step 2: Riverbanks
The next two commands to run are adjacency masks and will affect the blocks next to a certain block, in this case, blue wool. First, you want to run //rep 2&|[35:11][1][8] 35:15, then //rep 2&|[35:15][1][8] 35:15,2. Then run //rep 2&|[35:15][1][8] 35:12, and then //rep 2&|[35:12][1][8] 35:12,2. Finally, run //rep 2&|[35:12][1][8] 35:1 and then //rep 2&|[35:1][1][8] 35:1 two times. Then, using //sel poly, roughly select an area of grass and stack it 1 block up, in order to make the river in a ditch. Before we continue, let's break down the adjacency command. So the syntax is //rep (block being replaced)&|(this line means next to)[block that is replaced from][1][8] (block that replaces the block being replaced).

Step 3: River Foliage
So typically, at the edge of a riverbank, a lot of shrubs, and trees tend to grow, which helps block floodwater. So I like to use 2 schematics, which are NettleBocage and SedgeBush. In order to place schems, grab a snowball and type /schbr &NettleBocage. Capitalisation is important, as it won't work if you don't type it correctly. For the trees, I use LOakL, JElmS, PoplarM, JElmM. This last one hasn't yet been made a schem, but it will be soon

Step 4: Texturing
Now onto painting the placeholders. Start out by doing //rep 35:15 2149:4, then //rep 35:12 2034:0,2149:4. Next, use an adjacency mask to put gravel and dirt next to the mud. Do //rep 35:1&|[2034:0,2149:4][1][8] 3,13. Then do //rep 35:1 35:1,3,13. Do //rep 35:1 $forest, and then //rep 35:1 2. Now do //rep <35:11 2149:4. For this step, make sure that your selection is deep enough. Finally, do //rep 35:11&|[2149:4][1][8] 35:3 and then //rep 35:11 $river. To finish it off, do //rep 35:3,35:11 water. Ta-Da! You got a river now.

So hopefully this guide was helpful for you guys!
Last edited:


