Hello there builders, another terra lesson this week  . This time I'll be showing you how to do hills! So hills are probably the easiest part of making terrain. The commands I'll be using in this are relatively simple as well, so it should be a piece of cake. Hills can range from small inclines to great rounded peaks. Some notable examples of hills on the server can be seen at Varner, Luk's megabuild, the Tor and Frost. I'd encourage you all to take a look at these various projects, as they do hills quite well. Tying into the last lesson, these steeper hills are the setting for alpine rivers to form in, and as they flow down the hills, they can create some gradual ridges and gulleys. Ridges are simply put, the bits that stick out on a hill, and gulleys are the bits that are indented. It's in these gulleys that water collects, and so if there has been quite a lot of erosion, the sides of ridges may have exposed faces of rock. Real-life examples of this can be seen in the Lake District in England. These show hills that are still green, but have rocky faces where the water has carved away at them. So, onto the tutorial!
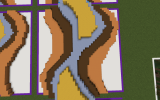
This tutorial is suited to starting on a blank canvas, i.e a flat area. So I start by setting the surface block to 35:0 - white wool. The first thing you want to do is run the command //sel poly while holding the WE wand. This allows you to create abstract shapes with your selection. I selected the points marked with orange concrete, and then ran the command //set 35:1. This change in colour will mark a rise by 1 block. I use the number after the 35: as a trick for myself so I know how many blocks I'm increasing the height by.
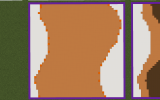
Next, we do a similar step to before, this time taking up a smaller area. The command to run this time is //set 35:2. Follow this pattern until you run out of space like so.
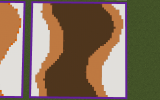
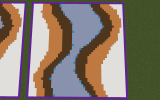
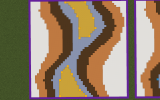
Once you've finished this gradient of wool, you want to do //sel cuboid (this returns your selection to a regular pos1 pos2 selection). You then want to select the entire area of your hill, and make the selection tall. I do //expand 10 u, which increases the selection height upwards by 10 blocks. Next, do //gmask 0 and then this is where the magic happens. In order to take this hill from a topographic image to a 3D landform, you want to run //rep >35:1 35:1. This, combined with the gmask, targets air blocks on top of 35:1 - orange wool. Now we only do this command once, so you get the correct incline. Next run //rep >35:2 35:2 twice. Once you get the pattern, you'll see its easy enough. Once you've got all the blocks to the correct height, you can smooth out any odd patches, and then run //rep 35 2 to set it to grass.
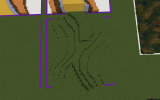
Ta-Da! You've got a hill. This method is very effective, despite being a little on the time-consuming side. The second method is applied when you already have a rough shape, and want to smooth it out. I use a combination of //sel poly and hand smoothing. Here's a before and after shot of a hill in Varner I've been smoothing.
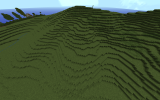
Before
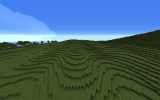
After
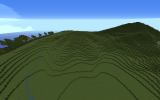
In order to do this, I select the points of the shape I want my hill to follow, expand the selection so it's the right height, and then do //set 2. This may interfere with underground areas, so be careful. Also, make sure your selection doesn't cross over itself otherwise you'll get something completely weird happening. When you get to hand-smoothing, you want to typically avoid straight sections where there shouldn't be, and also 45-degree angles. They end up looking really inorganic. There are some examples of these mistakes in the tutorial, which I'd hand fix if I could be bothered
This method is, again, time-consuming but worth the time and pain of smoothing it. It creates nicely smoothed hills and looks nice.
So go, do hills my children
This tutorial is suited to starting on a blank canvas, i.e a flat area. So I start by setting the surface block to 35:0 - white wool. The first thing you want to do is run the command //sel poly while holding the WE wand. This allows you to create abstract shapes with your selection. I selected the points marked with orange concrete, and then ran the command //set 35:1. This change in colour will mark a rise by 1 block. I use the number after the 35: as a trick for myself so I know how many blocks I'm increasing the height by.

Next, we do a similar step to before, this time taking up a smaller area. The command to run this time is //set 35:2. Follow this pattern until you run out of space like so.


Once you've finished this gradient of wool, you want to do //sel cuboid (this returns your selection to a regular pos1 pos2 selection). You then want to select the entire area of your hill, and make the selection tall. I do //expand 10 u, which increases the selection height upwards by 10 blocks. Next, do //gmask 0 and then this is where the magic happens. In order to take this hill from a topographic image to a 3D landform, you want to run //rep >35:1 35:1. This, combined with the gmask, targets air blocks on top of 35:1 - orange wool. Now we only do this command once, so you get the correct incline. Next run //rep >35:2 35:2 twice. Once you get the pattern, you'll see its easy enough. Once you've got all the blocks to the correct height, you can smooth out any odd patches, and then run //rep 35 2 to set it to grass.


Ta-Da! You've got a hill. This method is very effective, despite being a little on the time-consuming side. The second method is applied when you already have a rough shape, and want to smooth it out. I use a combination of //sel poly and hand smoothing. Here's a before and after shot of a hill in Varner I've been smoothing.

Before

After

In order to do this, I select the points of the shape I want my hill to follow, expand the selection so it's the right height, and then do //set 2. This may interfere with underground areas, so be careful. Also, make sure your selection doesn't cross over itself otherwise you'll get something completely weird happening. When you get to hand-smoothing, you want to typically avoid straight sections where there shouldn't be, and also 45-degree angles. They end up looking really inorganic. There are some examples of these mistakes in the tutorial, which I'd hand fix if I could be bothered
This method is, again, time-consuming but worth the time and pain of smoothing it. It creates nicely smoothed hills and looks nice.
So go, do hills my children


